To make something modular means that it can be deattached, measured, and weighed. It has properties of its own and it makes sense as a separate unit. Furthermore, it has known methods to interface with other modules. There are a number of properties that good modules have:
- Quickly deattachable, and ideally minimally disruptive to the paired system
- Standard interconnections, minimizing type and number of joining parts
- Specific-function optimized
- Unobtrusive in size & weight
- Stable & durable
- Regular geometry (e.g. stackable)
Modularity is a recursive concept, especially if a module can be considered as generically as part. Systems or assemblies are made of parts. Modules made of modules. Complex systems are systems of systems. Modules of modules of modules. These properties are great for documentation, repair, assembly, and engineering in general. In system design, I aim for Design for Modularity.
What does this mean? When I design, I want things that fulfill these criteria and traits as much as possible. I do so in order to help maintain their usefulness and adaptability.
Modular & Standard Parts
Hardware stores and Amazon are full of standard parts. The best of them are modular systems. There are many modular systems that are wide spread. One of my favorites and a go-to standard in mechanical prototyping is 8020 aluminium extrusion or more generally t-slot aluminium. In which a square bar of aluminium has a 4 slots going down the length. These slots are t-shaped and accept t-nuts which allow for various pieces of hardware to be mounted to them. Hardware mounts can be brackets/plates to hold these bars together into frames and boxes. They can be functional like joints and sliders. 3D printers are often made of t-slot aluminium. $200 on Ebay can buy a mess of “2020” (20 mm x 20 mm) t-slot aluminium, screw, t-nuts, and brackets. An angle grinder and file set can allow for cutting the bar at home. The consistency of the parts means that only a few types of hardware are needed and they can be bought economically in bulk. The modularity of the system, means that old projects can be improved or scrapped for parts with minimal time or waste.
Here are a few standard parts that are good to have (the most frequently used by me are bolded):
- 2×4″ Lumber
- Metal (aluminium & steel) & wood dowel rods (various diameters – 10 mm & 5 mm)
- Plywood 1/2″ thick
- “Thin” sheet material (1/4″ – 1/8″ thick) (acrylic, MDF, HDPE)
- ISO O-rings – For sealing air / liquids
- PVC piping
- 2020 T-slot Aluminium & t-nuts
- 608-2RS Type Ball Bearings
- Metric “M” screws (M3, M4, M5, M6, M8)
- Length (as needed)
- Most commonly 5, 10, 15, 20 mm
- Size (diameter in mm)
- M3-M5 – Small parts & 2020 aluminium
- M6-M8 – Heavy duty mechanisms
- Larger or smaller – As necessary for design & function
- Imperial vs. Metric – Use equivalent imperial if necessary, but its less easy for my simple mind than metric
- Thread Type:
- Machine – For threading into nuts
- Wood – For pointed tip and coarse threads for screwing into wood
- Self-Tapping – For self-drilling into sheet metal
- Socket Type:
- Phillips Head – For use with a normal screwdriver
- Allen Head – For use with an allen wrench
- Socket Shape:
- Button – Low-profile
- Socket – High strength
- Counter-sunk – TK Flat-profile when screwed into counter-sunk surface
- Hex – Nut-like head that can be rotated with 3D printed knobs
- Set – Embedded screw for fixing positioning
- Nuts:
- Standard – For most cases
- Locking – For vibration suitations
- Threaded Inserts – For threading 3D prints
- Washers:
- Standard – For most cases
- Locking – For vibration suitations
- Nylon – For rotating joints
- Length (as needed)
As your parts and designs become less standard, it will take more work to design, source parts, and document. The more standard parts are used, the more designs can be recycled. I like to get a few variety kits and then buy bulk quantity replacements if I run out of a type of standard hardware (e.g. screw, nut, etc).
These standard parts, with the right tools to process them, and a large 3D printer is sufficient to make countless functional items. These alone can make the a house, a desk, and rudiments of a 3D printer. Extended functionality that can approximate virtually any commercial product can be further obtained with the additional of other standard parts not listed. For example, an FDM 3D printer can be made with the addition of: stepper motors, stepper drivers, a microcontroller, power source, cable chain, linear bearings, threaded rod, and an extrusion head. As digital manufacturing methods mature, more of these can be printed and fewer need to be bought.
In trying to use standard components, I hope to gain a general functional understanding of mechanical and electrical engineering. I aim to slowly understand and utilize more modular systems to expand the functionality I can create.
Digital Fabrication, 3D Printing, Standard Parts, & Modularity
3D printing and standard parts are a match made in heaven. They shine where the other fails. These complementary characteristics allow for faster and easier design of a great diversity of objects and functions.
Standard Parts:
- Pros
- Cheap & available in bulk
- Predictable in performance
- Durable
- Easy to design with & process
- Cons
- Not customizable / limit scope of function
3D Printed Parts:
- Pros
- Customizable to virtually any shape / application
- Cheap to manufacture a few parts
- Cons
- Unreliable precision
- Costly or time-consuming to make large / many pieces
- Need to tinker to achieve target durability & functionality
Digital Fabricated Parts:
While 3D printers allow for the direct creation of custom or standard parts. The digital fabrication tools of CNC cutters provide a way to turn standard materials (e.g. plywood) into standard (or custom) parts thus leveraging their predictable properties and providing the flexibility of customization.
Hybrid Standard & 3D-Printed Systems
By coupling the two and looking to use each as modules as part of a system, you can play each of the strengths and diminish the weaknesses.
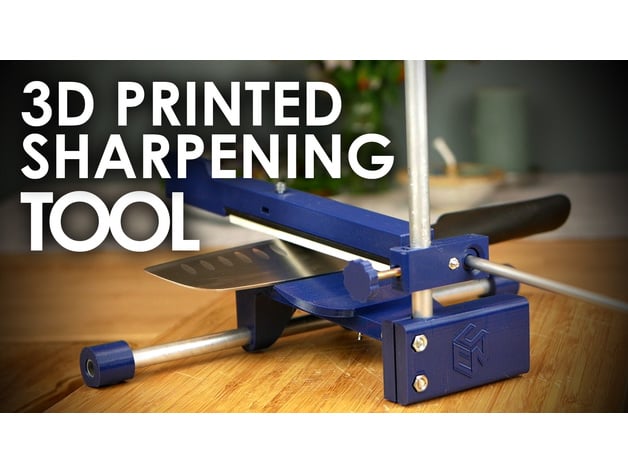
For example, a standard part – 3D print hybrid of CNC Kitchen’s knife sharpener uses aluminium rods and screws to connect 3D printed pieces together. These provide strong, reliable connections that don’t take any time to print. This allows for a relatively small amount of plastic (and thus print time/material) to be joined together into a larger functional mechanism. With the addition of a set of wetstones, the end production is a tool that surpasses most on the market and at a fraction of the price.
3D Printing Modularization Principles
Here are some principles I’ve identified in designs I’ve seen and in my design process with modularizing 3D prints.
Principle 1: Join Digitally Fabricated / 3D Printed Pieces with Standard Parts
Whenever joining two or more 3D printed pieces, it is best to use standard parts or designs to do so. These can be 3D printed (snap pins, modular connectors, snap-fittings) but some tinkering will be needed to ensure the right materials and tolerances are achieved. When commercial standard parts are used, the outcome is very repeatable and predictable.
Principle 2: Break Up Large Areas into Pieces
Large areas should be broken up to allow for more degree of freedom in the 3D printing (fitting inside the build area, orienting parts to optimize print quality). If possible, replace 3D printed sections with standard structural components (rods, 2020 aluminium, wood, etc) and fasten the 3D printed parts that need the customization to the standard ones. (See example of knife sharpener above).
Principle 3: Develop a Library of Designs & Tools for Modularity
Find a few standards and run with them. For example, explore making parts for t-slot aluminium. Figure out the tools and methods needed to work with t-slot. Get all the knick-knack hardware needed. Find ways to mount to t-slot, mount the t-slot to something else, join t-slot together, make functional mechanisms. As proficiency grows, explore new standard parts. Grow an understanding and library of 3D printed modular designs. Use the modular mounting system, try thread connections, and snap fitting. Try to retrofit an existing item to have modular connectors, for example your desk. Continue to develop ways to connect 3D prints to other things in standard ways and the calibration necessary for your setup. When you’ve locked down a design to focus on, write some notes, and use it often. Modular systems are more useful as they are used more often.
